Roon is an exceptional offering. One of its key benefits is that it offers a true audiophile-grade solution for multi-room audio. Of course, it does much more than that, but this post is not a review or feature discussion. There are plenty of those on the web!
This page explains why you might want to set up a Roon Core (Roon Server) in a VM, how to go about doing this and general performance observations.
Typically Roon is set up in one of three ways, each of which has key disadvantages that can be overcome with virtualizing Roon sever:
1) The first is running the server on an existing Windows or Mac desktop / laptop. The three big issues with this are that it requires the system to be always on to keep Roon connectivity, the desktop servers are much less reliable than Roon ROCK and that it can impact the performance of the system. This is the least appealing way to run Roon in my opinion.
2) Setting up Roon Server on a server-type machine (i.e. one designed to operate 24/7 as a server). This can be a Windows, Mac or Linux server, or even can run on some NAS’s. In general, this alleviates the issues of the first type of set up and is a great option. But if you’re also running other services on the server, then any issues that require a reformat mean that you need to set up every service again and not just Roon. Also troubleshooting in this scenario is much more complex.
3) Running Roon Server on a dedicated machine. This is typically a Roon Nucleus device or by using Roon ROCK on a compatible device, such as an Intel NUC. You can also do this by putting Roon Server on a dedicated machine, but if ROCK is certainly a better option if you’re going the dedicated hardware way (much more lightweight and also much more effortless to manage). While Roon advertises that ROCK is designed to work only on an Intel NUC, in general, I’ve found it will install very well on a wide array of hardware. This is a great option, but requires a significant upfront investment to buy the device and can be pretty space and power inefficient.
This is where running Roon Server or ROCK on a VM comes in. You get all the advantages of running Roon on a dedicated machine, while still being able to share the hardware with other services (such a Plex, an ad-blocker, etc…). If there is ever an issue with the Roon ROCK VM, then you can just revert to a previous snapshot of the VM (as long as you set Roon to backup regularly to somewhere other than the Roon ROCK VM)! And if you’re using a single machine to run multiple services, then it is likely to be way more power-efficient than running dedicated physical hardware for each service.
As an example, I run Plex, Roon, UniFi and a few other services all on the same machine. And it does this all brilliantly, even when there are multiple users on each service at once. Obviously, you need to pick the right server hardware for this sort of setup, but that is not super complex and is something that I’ll go into in another post. But in my case, I’m able to run all of these services, including Roon, without issue and with super low power consumption (at idle less than 35w!).
I’ll try to update this from time-to-time if needs be. Just post a comment if you find that this tutorial needs an update. This tutorial works as of May 2021.
One other quick note. This tutorial assumes that you already know how to set up a VM. If you don’t, it’s super easy. Just try a Google search! For this tutorial, I’m using VirtualBox, but any hypervisor should work. The key thing is the right VM config, which this guide covers.
The other quick preamble is that this is generally a guide for Windows users. I’ll try to add some Linux notes to this over time, as frankly there is little difference in the method. Also, I’ll aim to write a Linux / KVM guide for the same at some point as I actually think that is a better scenario.
Step 1 – Download Roon ROCK and extract the .img file
Step 2 – Convert the .img file into a .vdi file
If you’re using VirtualBox, it won’t allow you to install the Roon ROCK system from a USB stick. As such we’ll get the software on to the VM using another method:
> For Windows users:
i) Rename the .img file (that you just extracted) to something simple, like ‘roonbox.img’
ii) Move the ‘roonbox.img’ file to your VirtualBox program folder. By default, it can be found at ‘c:\Program Files\Oracle\VirtualBox’
iii) Open a command line window as an Administrator (hit the Windows Key, type ‘cmd’ and select the option ‘Run as administrator)
iv) Navigate to the VirtualBox program folder by typing ‘cd\Program Files\Oracle\VirtualBox’
v) Use the following command to create the .vdi file: ‘VBoxManage.exe convertdd roonbox.img roonbox.vdi’
vi) Delete the ‘roonbox.img’ file (you no longer need it)
vii) Move the newly created ‘roonbox.vdi’ file to your Desktop (or somewhere else convenient)
viii) Leave this command line window open for now.
Step 3 – Set up your VM
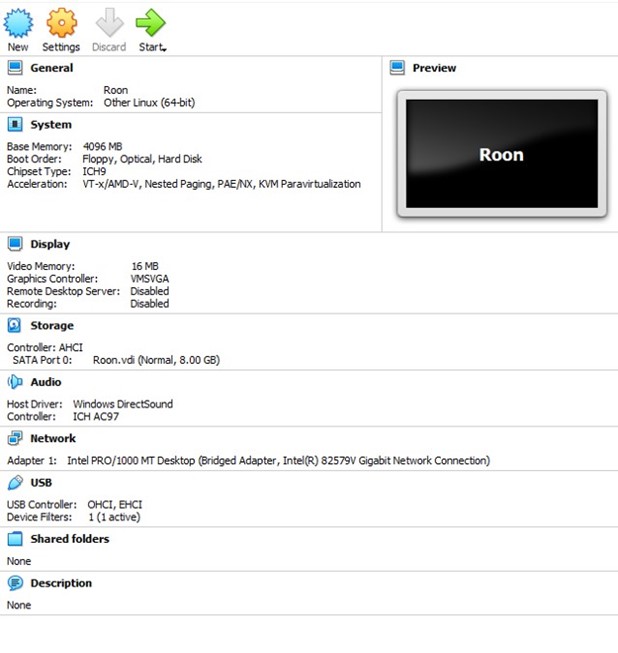
Set up a new VM in VirtualBox using the VirtualBox Manager. The key settings that you will need:
-
- OS: Other Linux (64-Bit)
-
- RAM: 2 to 8GB
ROCK will run on 2GB , but if you’re anticipating a larger library or use of DSP you might want to allocate more. This is something you can easily change once installed, so I’d start with 2GB and up the RAM allocation later if performance is not what you want it to be.
- RAM: 2 to 8GB
-
- Hard Drive: 64GB or more.
I’d also select to use dynamically allocated storage if there is the option for this as the Roon database can be quite small unless you have a large number of albums (over 5,000). I use 192GB, but that’s only because I have space to spare on my server storage. Frankly, it’s stupid overkill.
- Hard Drive: 64GB or more.
-
- CPU Cores: 2+
Again this is something you can change afterward if performance is lower than desired. But with any modern, multicore processor, this really shouldn’t be a major issue. Library size and use of DSP cause the main strain on the CPU. You can even start with 1 core and see how you get on. If you’re looking to get a sense on what you might need here, Roon’s advice is “Roon currently runs the DSP engine on one CPU core per zone–so this reflects the load relative to consuming a full core.”
- CPU Cores: 2+
-
- Network: Bridged to your network adapter of choice (preferably ethernet).
There is a super-strong preference here to use a wired ethernet connection if at all possible. WiFi connections simply aren’t as reliable and can cause playback issues.
- Network: Bridged to your network adapter of choice (preferably ethernet).
The following settings shouldn’t be of much consequence, but in case you run into issues. I wouldn’t bother setting these specifically unless you need to:
-
- Chipset Type: ICH9
-
- Storage Controller: AHCI
-
- Graphics Controller: VMSVGA
Step 4 – Add the .vid file into the new VM
Before you start the VM for the first time, you’ll need to add the .vdi file that you just created.
-
- Select the new VM in your VirtualBox Manager
-
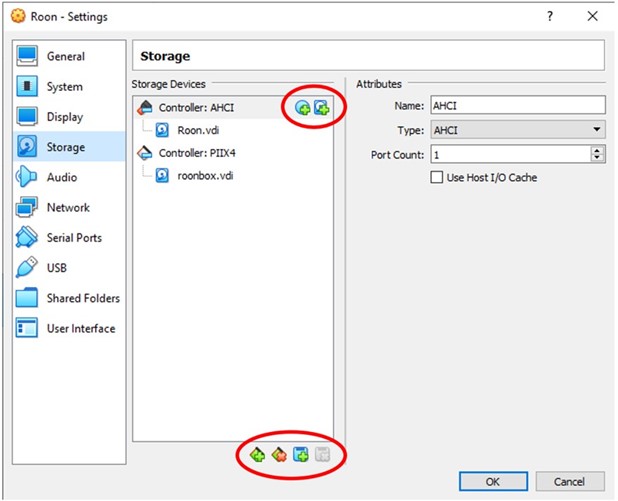
- Select ‘Settings’ and navigate to the ‘Storage’ section
-
- Using the buttons near the bottom of the window, ‘Adds a new storage controller’. Select the ‘PIIX4 (Default IDE)’ option.
-
- Next to the new controller, there are two icons. Use the one which ‘Adds Hard Disk’
-
- On the ‘Hard Disk Selector’ window click ‘Add’. Navigate to your Desktop (or wherever you left the roonbox.vdi file) and select it.
-
- Make sure ‘roonbox.vdi’ is highlighted and then click the ‘Choose’ button.
-
- If you did all this correctly you’ll see 2 controllers on the ‘Storage’ section of the VM Settings, one for the VM itself and one for the ‘roonbox.vdi’.
Step 5 – Enable the keyboard for your Roon VM
You’ll need to do this step to enable your keyboard to work on the VM. If you don’t, everything will work, but you won’t be able to progress through the installation as your keyboard won’t work!
-
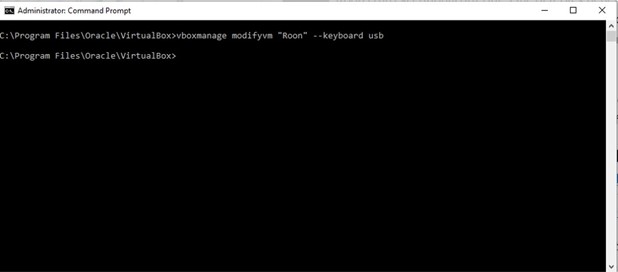
- Go back to the command line window that you left open in Step 2
-
- Enter the following command: ‘vboxmanage modifyvm “$VM” –keyboard usb’.
-
- You will need to replace the $VM with the name that you gave your VM in VirtualBox Manager.
-
- My VM is call ‘Roon’ (inventive, I know…), so the command I would enter is: ‘vboxmanage modifyvm “Roon” –keyboard usb’
-
- Enter the following command: ‘vboxmanage modifyvm “$VM” –keyboard usb’.
-
- You can now close the command line window.
Note: thanks to Yethal for this step.
Step 6 – Starting up your VM for the first time
-
- Start your VM from the VirtualBox Manager!
-
- When appropriate, hit the F12 key to select your boot device. Select the IDE controller (the AHCI controller is the hard drive you’re going to install too; the IDE one is the one that contains the installation files). If you miss the opportunity to do this, just restart the VM.
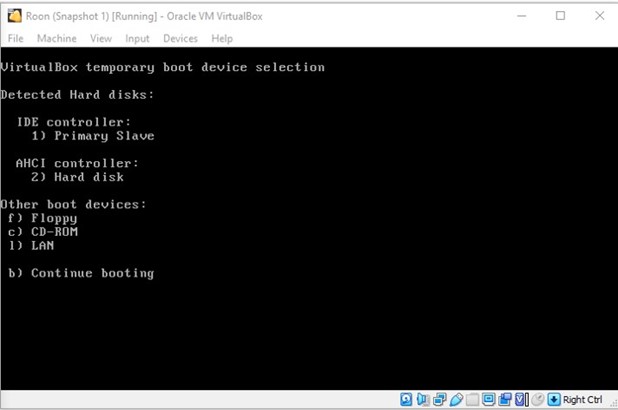
Note: at this point, you may not have mouse control anymore as the VM will have captured it and there is no OS support to release it. That’s not a problem. If you need to recapture the mouse for any reason, just press the Right-CTRL button on your main keyboard.
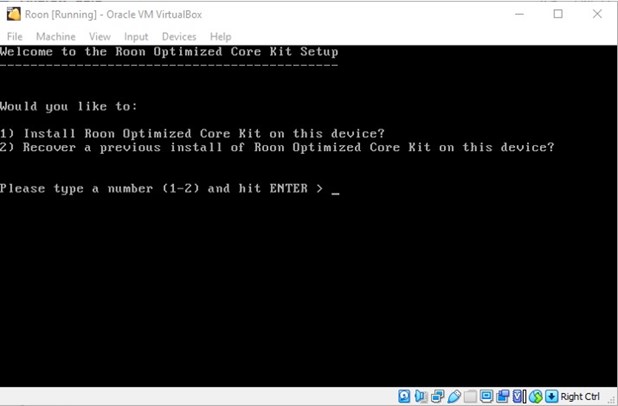
Step 7 – Install Roon ROCK
-
- Select option 1 and press enter
-
- Select the Hard Disk that you want to install on. There will likely be just one option if you’re following this guide, so hard to get it wrong!
-
- Press ‘y’ and enter on the next screen to confirm that you want to install, and then let the machine do its thing.
-
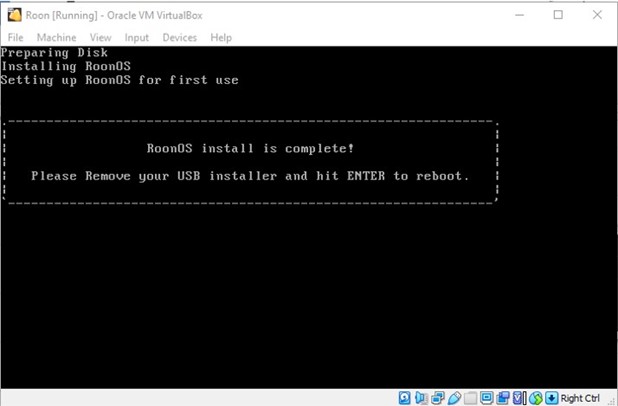
- You’ll know that Roon ROCK is installed because the VM will tell you so. At this point power off the VM (by closing the VM window.
-
- Before you restart the VM, remove the ‘roonbox.vdi’ hard disk and controller from the Storage settings. Do not remove the regularly vdi, which now contains your installed Roon ROCK system! You can also delete it from your system too. Again, we’ll no longer need it.
-
- Restart the Roon ROCK VM.
-
- Once it boots, it will let you know the IP address that you can access the Roon ROCK server.
Step 8 – Install the Codecs
-
- Using a web browser, navigate to the IP address shown on the Roon ROCK server. You’ll notice that there are missing codecs. This is normal.
-
- To remedy the missing codecs we’re basically going to follow the regular method, as listed on the Roon website.
-
- If you are having trouble with accessing the Roon server using ‘\\ROCK\’, then you can just replace the word ‘ROCK’ with the IP Address on your Roon Rock server.
-
- When you’ve followed the codecs guide on the Roon website, the page on your web browser will let you know that everything is okay. If it’s still showing missing codecs, refollow that guide.
Note: let me know in the comments if you want me to expand on this section. It’s something that a few people have issues with, but the Roon guide is pretty good.
Step 9 (Optional) – Set the Roon VM to Auto Start on boot
If you reboot the server you might want to configure it so that the Roon VM automatically starts. To do this:
> For Windows users:
i) From the VirtualBox Manager, select the Roon VM and select the option ‘Create Shortcut on Desktop’
ii) Press the Windows Key and R at the same time. In the run window, type ‘shell:startup’. A new Windows Explorer window will open.
iii) Move the newly created shortcut from your Desktop to that newly opened folder.Step 10 – Use Roon as normal
Just open up a Roon client as normal and everything should just work. Normal usage and other support can be found at the ROCK Install Guide (roonlabs.com).
-
- Once it boots, it will let you know the IP address that you can access the Roon ROCK server.
Music Locations
On Roon ROCK you cannot put your music files on the server. If you do, on reboot, they will just be deleted. So you’ll need to have your digital music in a location anywhere outside of the VM. This is normal Roon ROCK operations and has nothing to do with the fact you’re doing this on a VM.
Roon Database Backups
For the sake of ease, I have my Roon server backup to a location away from the server / VM. That way, if I ever need to restore, I can freely revert to a previous VM snapshot and then do a restore from the backup location.
You can also use the Roon backups if moving from one system to another (such as moving from dedicated hardware to a VM). You can happily have two Roon cores running in parallel, so use this backup / restore functionality to get the new VM working before you permanently take out the old system.
VM Backups
Once your VM is working as you want, you can easily create a backup of it and store it away in case you ever need to do a restore. Even if it’s years until you need to call on this, that is okay because doing an update to Roon ROCK and then calling on the latest backup to restore your database is super easy and quick.
In VirtualBox, the quickest option is just to copy the VM .vdi file itself, which will achieve a similar purpose. You can find the .vdi file in your VirtualBox VMs folder. Just make sure that the VM is off when you do the copy! The Virtual Media Manager, which you can access from the file menu in VirtualBox Manager is helpful here.
Network Considerations
Like any service on your network, you’ll need each Roon client and Endpoint to have access to the new VM. This is totally the same as if you were just plugging in a Roon Nucleus or a laptop / desktop with Roon on it. It’s the reason we selected a bridged connection in the tutorial above, as this will just create an IP address on the main network that the server is connected to. Just because we’re doing things in a VM here doesn’t really change any of the normal rules.
Equally, if you’ve configured your network, firewall and / or server to operate in a specific way, then you’ll have to make sure your VM can work in accordance with this. But for normal home users / situations, this won’t be an issue.
Automating Roon ROCK VM Setup
Yethal, has created an automated script to achieve the same outcome that the tutorial in this post achieves. If you want to check it out, you can find it here.
Performance / Issues
TLDR – there is no practical difference between running Roon ROCK on a VM or on dedicated hardware.
As long as you’re not overstretching your server, you will likely never notice a difference between a VM and dedicated hardware. If you’re expecting a low core count, very old CPU to handle multiple Roon streams, Plex transcodes, and so forth all in parallel, then of course the system will not be able to cope. But assuming that you’ve built the server with sensible overhead in terms of CPU power, and mindful of what you’re going to use it for, you’re not going to have an issue.
In general, Roon ROCK is hyper-efficient and certainly the most efficient way of running a Roon server.
If you’re experiencing performance issues, you’ll likely notice it in slow access to the albums database or breaks in the audio stream. If this happens, then the best remedy is to increase the CPU cores available to your VM.
What taxes a system using Roon is either the sie of the database (as the CPU needs to process this for access) or using DSP, which is much more processor intensive. Personally, I don’t use DSP (I prefer to do that at the end-point) and my stored music library is mid-sized. I generally use Tidal now for most of my listening. And in this scenario, I never experience issues.
Sound quality
TLDR – there is no difference between the audio quality from Roon ROCK, whether on a VM or dedicated hardware.
I’m of the school that believes that it’s just data that is being streamed, so whether coming from a Roon Nucleus, dedicate Roon ROCK hardware, a VM, or any other scenario, it makes no difference. As long as the hardware is powerful enough to handle the load being placed on it (see the note above on Performance), then you’re getting the same bit-perfect audio from Roon ROCK on a VM as you would in any other scenario. RAAT is the streaming tech that Roon uses and it’s simply awesome in my opinion.
Now I get that there are folks out there who feel differently on this topic. They’re usually the same folks who feel that multi-thousand dollar cabling is worth it or who invest in ‘audiophile grade’ ethernet cables. I’m not in that camp, but I respect their opinion. The true joy of being an audiophile is that you care about your hobby. This is way too large a topic to handle as a side note in a post on a totally other topic, but if you feel there is a major audio difference between running Roon ROCK in a VM or on a dedicated Intel NUC, then please let me know in the comments. I’d love to learn more about what you’re experiencing and why you think this difference is occurring. Always happy to learn!
I really appreciate the effort you put into this article. I’ve run into an issue where ROCK is not updating. It is failing to download the file. I turned off the firewall in Windows Server, but that did not help. Any thoughts?
Diagnosing this is challenging without knowing your environment, but I’m guessing from your question that Roon is otherwise broadly working. As such the issue is likely not within your internal network, but more getting to the outside. My first point of investigation would be your router to check if it is blocking your VM getting out of your network.